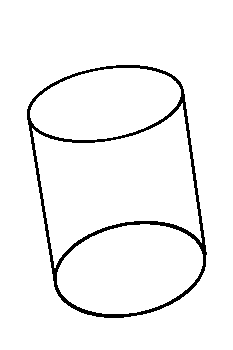
Geometric Shapes: Cylinders
A drawing of a cylinder is made of two ellipses, with varied pitches, connected by lines that go to vanishing points.
Note: Though the sides of an actual cylinder are parallel, in a drawing, the lines connecting the ellipses will converge and are not parallel.

Cylinders
By adding converging lines between the ellipses, we create
a cylinder.
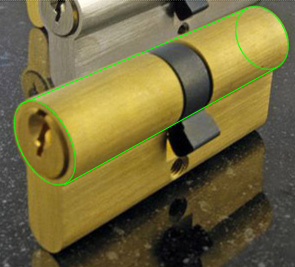
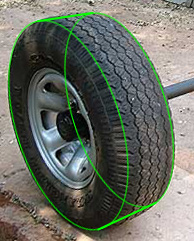
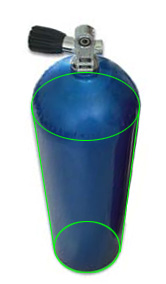
Examples of foreshortened cylinders
To draw a vertical cylinder
Note: By following these steps, the cylinder drawn will be slightly below eye level.
Step 1: Draw a vertical line to determine how tall your cylinder will be. This line will be the center line.
Step 2: At the top, draw a horizontal line that is perpendicular to the center line. Do the same thing on the bottom. These lines are the major axes.
Step 3: Divide the top horizontal line into two equal halves using the transfer paper. Divide the bottom horizontal line into two equal halves that are slightly shorter than the top length.
Step 4: Draw the sides of the cylinder with converging lines from the top left and right points to the bottom points on the horizontal line.
Step 5: Draw the minor axis height for the top ellipse by marking an equal distance above and below the major axis. Do the same thing on the bottom, but make that minor axis slightly taller.
Step 6: Draw curved lines on each end of the major axes that correspond to the minor axes height.
Step 7: Complete the ellipses by drawing arcs to and through the minor axis height
Step 8: Emphasize the top ellipse, sides, and bottom half with thicker lines. This separates the visible exterior ellipse from the non-visible interior ellipse of the cylinder.
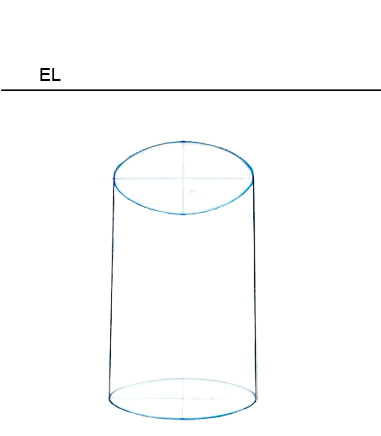
Drawing a Vertical Cylinder
Cylinder: In this cylinder, the EL/HL is above the cylinder.
To draw a horizontal cylinder
Note: The cylinder drawn, by following these steps, will be slightly to the right of the line of sight.
Step 1: Draw a center line to determine how wide your cylinder will be.
Step 2: At the left, draw a vertical line that is perpendicular to the center line. Do the same thing on the right. These lines are the major axes.
Step 3: Divide the left vertical line into two equal halves using the transfer paper. Divide the right vertical line into two equal halves that are slightly shorter than the left length.
Step 4: Draw the sides of the cylinder with converging lines from the top left point to the top right point and from the bottom left point to the bottom right point of the major axis.
Step 5: Draw the minor axis length for the left ellipse by marking an equal distance to the left and right of the major axis. Do the same thing on the right, but make that minor axis slightly wider.
Step 6: Draw curved lines on each end of the major axes that correspond to the minor axes lengths.
Step 7: Complete the ellipses by drawing arcs to and through the minor axis lengths.
Step 8: Emphasize the left ellipse, sides, and right front half with thicker lines. This separates the visible exterior ellipse from the non-visible interior ellipse of the cylinder.
Drawing a Horizontal Cylinder
Cylinder: The cylinder drawn, by following these steps here, will be slightly to the right of the line of sight.
Bad Cylinders
One of the most common errors that people make when drawing cylinders is reversing the pitches.
Bad Cylinder: The ellipse that is closest to the eye level should have more pitch (be more foreshortened and flatter) than the ellipse that is farther below the eye level. The ellipses on this cylinder are backwards.
Remember, the pitches of ellipses decrease (become taller) as they move farther away (above or below) from the eye level. The pitches of ellipses also decrease (become wider) as they move farther away (left or right) from the line of sight.