How to: Geometric Shapes
Drawing a Box in 2 Point Perspective
Follow the steps shown above to draw a box in 2 point perspective. Be sure to place your two vanishing points off the format (page). This will help keep your box withing the cone of vision and not become distorted.
Drawing a Cube in 2 Point Perspective
Click on the thumbnails to see the drawing steps. With this example, the two vanishing points are located about 13 inches off each side of the format.
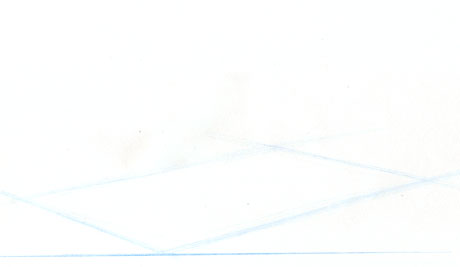
Step 1: Begin by drawing an eye level line on the top 1/3 of your page. Select your vanishing point, which will be on the right 1/4 of the eye level line. Click on the thumbnails to see the drawing steps.
Step 2: On the bottom 1/3 part of your page, draw a horizontal line approximately .5 inches in length.
Step 3: With a separate piece of paper, lay the edge next to the horizontal line and mark the length of the line on a transfer paper. Use these marks to measure and then draw the remaining three sides of the square.
Step 4: Lightly draw diagonal/converging lines from all four corners of the square to the VP.
Step 5: Draw the bottom horizontal line of the back plane approximately 1 inch above the front plane and extend this line to the two bottom diagonal/converging lines.
Step 6: Where the horizontal line meets the diagonal/converging lines, draw the vertical lines of the back plane up to the top diagonal/converging lines.
Step 7: Extend the top horizontal line from the top of the two vertical lines. This completes the back plane of the cube.
Step 8: Emphasize the top plane and front plane with thicker lines. This separates the visible exterior planes from the non-visible interior planes.
Step 9: Using the same vanishing point, draw a second cube to the left of the first by repeating steps 2–8.
Drawing an ellipse

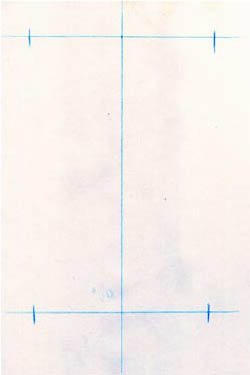
Step 1: Determine the size by lightly drawing the major axis.
Step 2: Find the exact center of the major axis line and draw another line perpendicular to the major axis with the distance above the major axis being equal to the distance below the axis. This is your minor axis and this will determine the pitch of the ellipse.
Step 3: Gently draw the curved ends on the major axis. When both curves are symmetrical, lightly draw in the remaining portion of the ellipse above and below the major axis, making sure that the curves touch the top and bottom of the minor axis line. The division of the axis lines will create four equal-mirrored quadrants.
Step 4: Check and correct for symmetry, and draw finished, darker lines.
Drawing a Vertical Cylinder
Cylinder: Here, the EL/HL is above the cylinder.
Note: By following these steps, the cylinder drawn will be slightly below eye level.
Step 1: Draw a vertical line to determine how tall your cylinder will be. This line will be the center line.
Step 2: At the top, draw a horizontal line that is perpendicular to the center line. Do the same thing on the bottom. These lines are the major axes.
Step 3: Divide the top horizontal line into two equal halves using the transfer paper. Divide the bottom horizontal line into two equal halves that are slightly shorter than the top length.
Step 4: Draw the sides of the cylinder with converging lines from the top left and right points to the bottom points on the horizontal line.
Step 5: Draw the minor axis height for the top ellipse by marking an equal distance above and below the major axis. Do the same thing on the bottom, but make that minor axis slightly taller.
Step 6: Draw curved lines on each end of the major axes that correspond to the minor axes height.
Step 7: Complete the ellipses by drawing arcs to and through the minor axis height.
Step 8: Emphasize the top ellipse, sides, and bottom half with thicker lines. This separates the visible exterior ellipse from the non-visible interior ellipse of the cylinder.
To draw a horizontal cylinder
Note: By following these steps, the cylinder drawn will be slightly slightly to the right of the line of sight.
Step 1: Draw a center line to determine how wide your cylinder will be.
Step 2: At the left, draw a vertical line that is perpendicular to the center line. Do the same thing on the right. These lines are the major axes.
Step 3: Divide the left vertical line into two equal halves using the transfer paper. Divide the right vertical line into two equal halves that are slightly shorter than the right length.
Step 4: Draw the sides of the cylinder with converging lines from the top left point to the top right point and from the bottom left point to the bottom right point of the major axis.
Step 5: Draw the minor axis length for the left ellipse by marking an equal distance to the left and right of the major axis. Do same thing on the right, but make that minor axis slightly wider.
Step 6: Draw curved lines on each end of the major axes that correspond to the minor axes lengths.
Step 7: Complete the ellipses by drawing arcs to and through the minor axis lengths.
Step 8: Emphasize the left ellipse, sides, and right front half with thicker lines. This separates the visible exterior ellipse from the non-visible interior ellipse of the cylinder.
Drawing a cone

Step 1: Draw a horizontal line approximately 5 inches in length on the bottom third of the page. This line is the major axis of the ellipse.
Step 2: Divide the major axis in half and extend a perpendicular line up approximately 5 inches above, and 2 inches below, the major axis. This is the center line.
Step 3: Establish the minor axis by marking the center line an inch above and an inch below the major axis.
Step 4: Draw curved ends on the major axis that correspond to the pitch of the ellipse.
Step 5: Draw an arc to and through the marks on the center line, above and below the major axis.
Step 6: Draw diagonal lines to the top point of the center line.
Step 7: Emphasize the sides and bottom half of the ellipse with darker and thicker lines.