Plumb Line Tutorial: Looking for Position and Angle
In order to achieve perfect proportion for any object, including people, a comparison of key landmarks must be identified and marked clearly. Size, position, and angle of the object’s key landmarks (height, width, corners, tops, bottoms, sides, vanishing point angles, etc.) are critical, and must be looked for, discovered, and then accurately recorded on your drawing.
It is important to compare size, position, and angle of key landmarks with the actual object while you are drawing it.
Refer to the Tutorial Videos (found in the "Assignments: Negative Space and Perspective" in the menu at right) to measure and compare height to width and plane to plane on the cube. This is essential for artists in looking for, discovering, and recording position and angle.
Note: Do not erase any “mistakes” throughout this exercise. I need to see your process to make sure you are getting the principles. Emphasize the final cube with darker lines.
Below you will find the individual steps of the cube which the video covers. Watch the videos first, then if you need additional direction, you can check the steps below.
Steps 1–10
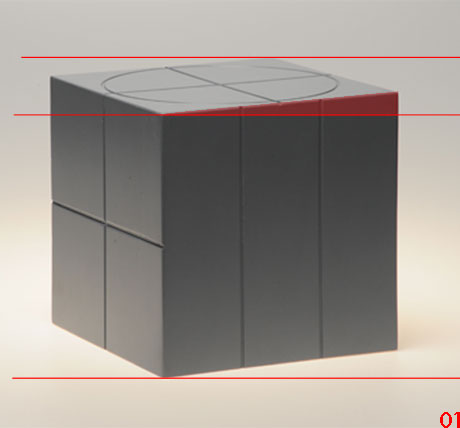 |
Step 1: Obtain a new printout of the pdf file, and redraw the top and bottom plumb lines. Add another line on both the printout and your drawing which touches the closest top corner. Compare the highlighted angle on your print out with the angle on your drawing. How well did this angle match the estimate on your drawing? Lightly make adjustments if necessary. |
Steps 9–12
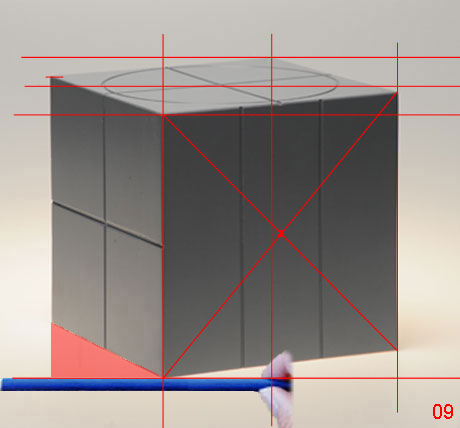 |
Step 9: Estimate the bottom left corner angle and draw the same angle on your sketchbook. |