Chapter 2: Calculators and Formulas
Section 2.1: Exponents and Calculator Usage
While we are on multiplication, did you know that there is some short hand? Remember when we started multiplication we did:
6+6+6+6+6+6+6+6+6(Nine 6s) = 54
but we did it a bit shorter:
9x6 = 54
There is a way to write multiplication in shorthand if you do the same thing over and over again:
2x2x2x2x2x2x2(Seven 2s) = 128
For the shorthand we write 27 = 128.
That little 7 means the number of times that we multiply 2 by itself; and it is called an exponent (sometimes we call it a power). Here are a couple more examples:
53 = 125 72 = 49 24 = 16
Pretty slick. You won’t have to memorize them...yet, but you should be familiar enough with them to be able to find them.
Some of the easiest to find are the powers of 10. Try these:
104 = 10,000 108 = 100,000,000 103 = 1,000
EXAMPLE
Solve 74
| 74=7×7×7×7 49 × 7 × 7 343 × 7 2401 Answer: 2401 |
Set up the bases, and then multiply each couple in turn. |
Section 2.1 Exercises
Part A
Section 2.1 Exercises Part APart B
Section 2.1 Exercises Part BPart C
Section 2.1 Exercises Part C
Section 2.2: Exponents and Calculator Usage
DEFINITIONS & BASICS
1) Variables: These symbols, being letters, actually represent numbers, but the numbers can change from time to time, or vary. Thus they are called variables.
Example: Tell me how far you would be walking around this rectangle.
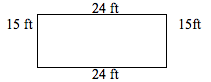
It appears that to get all the way around it, we simply add up the numbers on each side until we get all the way around.
24+15+24+15 = 78
So if you walked around a 24ft X 15ft rectangle, you would have completed a walk of 78 ft. I bet we could come up with the pattern for how we would do this all of the time.
Well, first of all, we just pick general terms for the sides of the rectangle:
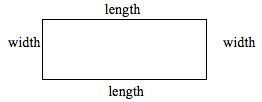
Then we get something like this:
Distance around the rectangle = length + width + length + width
Let’s try and use some abbreviations. First, “perimeter” means “around measure.” Substitute it in:
Perimeter = length + width + length + width
Let's go a bit more with just using the first letters of the words:
P = l + w + l + w
Notice now how each letter stands for a number that we could use. The number can change from time to time. This pattern that we have created to describe all cases is called a formula.
2) Formula: These are patterns in the form of equations and variables—often with numbers —which solve for something we want to know, like the perimeter equation before, or like:
Area of a rectangle: A = B x H
Volume of a Sphere: V = 43πr3
Pythagorean Theorem: a2 + b2 = c2
Through the same process we can come up with many formulas to use. Though it has all been made up before, there is much to gain from knowing where formulas come from and how to make them up on your own. I will show you on a couple of them.
Distance, rate
If you were traveling at 40mph for 2 hours, how far would you have traveled? Well, most of you would be able to say 80 mi. How did you come up with that? Multiplication:
(40)(2) = 80
(rate of speed) (time) = distance or in other words: rt = d where
r is the rate
t is the time
d is the distance
Percentage
If you bought something for $5.50 and there was a 8% sales tax, you would need to find 8% of $5.50 to find out how much tax you were being charged.
.44 = .08(5.50)
Amount of Tax = (interest rate) (Purchase amount) or in other words:
T = rP where
t is tax
r is rate of tax
P is the purchase amount.
Simple Interest
This formula is a summary of what we did in the last section with interest. If you invested a principal amount of $500 at 9% interest for three years, the amount of interest would be given by the formula:
A = 500(1.09)3 = $647.51
A = P(1 + r)Y where
A is the Amount in your account at the end
P is the principal amount (starting amount)
r is the interest rate
Y is the number of years that it is invested.
Temperature Conversion
Most of us know that there is a difference between Celsius and Fahrenheit degrees, but not everyone knows how to get from one to the other. The relationship is given by:
C59(F - 32) where
F is the degrees in Fahrenheit
C is the degree in Celsius
Money
If you have a pile of quarters and dimes, each quarter is worth 25¢ (or $.25) and each dime is worth 10¢ ($.10), then the value of the pile of coins would be:
V = .25q + .10d where
V is the Total Value of money
q is the number of quarters
d is the number of dimes
3) Common Geometric Formulas: Now that you understand the idea, these are some basic geometric formulas that you need to know:
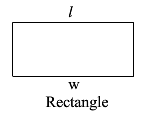 |
P = 2l + 2w A = lw |
P is the perimeter l is the length w is the width A is the Area |
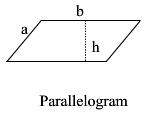 |
P = 2a + 2b A = bh |
P is the perimeter a is a side length b is the other side length A is the Area |
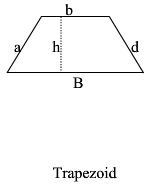 |
P = b+a+B+d A = 12h(B+b) |
P is the perimeter b is the little base B is the big base a is a leg d is a leg A is the Area |
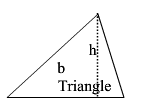 |
P = s1+s2+s3 A = 12bh |
P is the perimeter A is the Area |
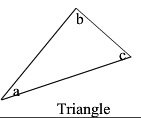 |
a + b + c = 180° | a is one angle b is another angle c is another angle |
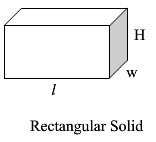 |
SA =2lw+2wh+2lh V = lwh |
l is the length h is the height w is the width SA is the Surface Area V is volume |
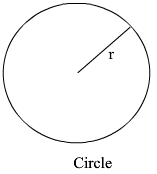 |
C = 2πr A = πr2 |
C is the Circumference or Perimeter π is a number, about 3.14159 . . . it has a button on your calculator r is the radius of the circle A is the area inside the circle. |
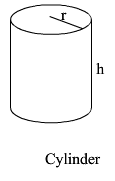 |
LSA = 2πrh SA =2πrh+2πr2 V = πr2h |
LSA is Lateral Surface Area = Area just on the sides h is the height SA is total surface area π is a number, about 3.14159 . . . it has a button on your calculator r is the radius of the circle V is volume |
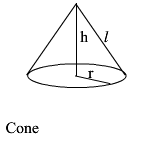 |
LSA = πrl SA =πr2+πrl V = 13πr2h |
LSA is Lateral Surface Area = Area just on the sides h is the height SA is total surface area π is a number, about 3.14159 . . . it has a button on your calculator r is the radius of the circle V is volume |
 |
SA =4πr2 V = 43πr3 |
r is the radius SA is total surface area V is volume |
Section 2.3 – More Formulas
A calculator is a beautiful thing. You have been able to use one for a short time now and have probably enjoyed it considerably when compared to doing all of the math by hand. You are now ready to take another step with a much more powerful calculator – a computer. During this lesson, you are going to learn the basics of spreadsheets and how to make a computer do the calculations for you.
During this discussion, we will use Microsoft® Excel as the spreadsheet, but similar functions can be done in spreadsheets that are available at no cost such as OpenOffice – Calc.
Microsoft® Excel Basics
Microsoft® Excel is spreadsheet software that allows you to perform calculations that help solve math problems in this course. You supply key figures and Excel automatically makes the calculations for you.
Open Excel on your computer by clicking Start then Programs then Microsoft® Excel. The main spreadsheet in Excel will appear. The spreadsheet is divided into cells, each of which has a column and row address. Excel identifies columns by alphabetical letters and rows by numbers. The first cell in the upper left corner is A1. The cell to the right of it is B1 and so forth. The cell below A1 is A2 and so forth. You enter numbers, formulas, or words into the cells.
Use the following guidelines as you enter data into Excel.
- It is easiest to enter numerical data in cells by using the number keypad on your keyboard. Be sure the Num Lock key is pressed and the Num Lock light is on.
- The number keypad also has four arithmetic functions you will need which are + (plus), - (minus), * (multiply), and / (divide). It also has the numbers and an enter key so you can enter data rapidly using the keypad.
- Enter the = (equal) sign in the cell before you perform any calculation in Excel. This tells Excel you want it to perform a calculation.
Use the following guidelines to format data in Excel.
- Never enter dollar signs ($) or commas (,) when entering data in Excel. Enter these by formatting the cell
- Right click the cell or range of cells and select Format Cells. This opens a window that allows you to set the format in number, general, currency, percent, etc. You can set the number of decimal points you want to use and you can set alignment, font, etc. in this window. The cell format already has been set in most of the exhibits you will be using in this course.
Lifelong Income Example – Beginning Salary
You can estimate your lifelong income using Excel by opening the “Lifelong Format” in I-Learn that is found in Course Information under Lesson Resources and Chapter 1 Lesson 1. Remember to press the Shift key when opening the Lifelong Format so that it will open in a new browser window, give you the full use of Excel, and allow you to save the document if you wish.
If the Standard and Formatting Toolbars are not visible when you open Excel, you should open them by clicking View at the top of the page and select Toolbars then Standard. Click View again then select Toolbars then select Formatting. You will want to do this each time you open a file in the Resources area.
To determine Lifelong Income do the following:
- Enter the beginning hourly rate you will earn in your first job after you graduate in cell E3, for example $15.00.
- Enter the number of hours you will work in a year in cell E5 as follows: =40*52 where 40 is the number of hours per week and 52 is the number of weeks in a year.
- Press enter. Excel automatically multiplies 40 hours per week times 52 weeks per year and provides the result or 2080 working hours per year.
- To calculate your first year salary in cell E7, enter (1) the equal sign, (2) click cell E3 (rate per hour) then enter * (multiplication sign) and (3) click cell E5 (hours per year).
- Press enter. Excel calculates your first year’s income at $31,200. These entries are illustrated below:
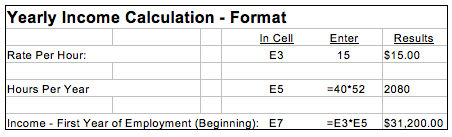
When you click on a cell that has a calculation set up, the formula for that cell appears in the formula line (to the right of the = sign) at the top of the page. For example, the formula line for the calculation performed in step 5 above would be: =E3*E5
Once your calculations are in place, Excel can save you time and effort if changes are required. If you were to change the beginning rate per hour to $10.00 and you have used the cell addresses in each of your formulas, Excel will recalculate all of the numbers and give you the new values. Try it. Enter “10” in E3 and watch what happens to the Income.
To help get you used to formulas in Excel and how they work, we will use some of our familiar formulas from last week:
Circle Example
Pick a cell to be where you will enter the radius – B2. Put “2” in B2 as a starting radius. Then we write the formula for area in a cell next to it – C2. Remember the formula for area of a circle is
πr2
So, in C2 we write
"=PI()*B2^2"
(π*variable for radius^exponent in Excel)
Then you will notice that the area 12.5667 pops up in C2.
Change the radius to “7” and you will be able to see that the area automatically changes. Nifty, isn’t it? You can change the radius to anything that you would like to and the area of a circle with that radius will show up right next to it.
Now, the power of Excel doesn’t stop just there. We can see the areas of a whole bunch of radii at the same time. List out several numbers in the cells beneath the “7” in B2. Now, if you copy the formula from C3 and paste it in C4, C5, C6, etc. you will notice that we can make a whole table of areas. If you label the columns, then others that see your spreadsheet will be able to tell what you did. It should look something like this:
| Circle | Radius | Area |
| 2 | 12.56637 | |
| 4 | 50.26548 | |
| 6 | 113.0973 | |
| 8 | 201.0619 | |
| 10 | 314.1593 | |
| 12 | 452.3893 |
Temperature Conversion Example
Make a column of numbers that are temperatures in Fahrenheit starting with cell C10. Then type in the formula that converts Fahrenheit to Celsius in D10:
“=5/9(C10 – 32)”
Copy and paste the formula into the cells next to the list of temperatures. See if it looks something like this:
| Fahrenheit | Celsius |
| -40 | -40.0 |
| -20 | -28.9 |
| 0 | -17.8 |
| 15 | -9.4 |
| 32 | 0.0 |
| 38 | 3.3 |
| 45 | 7.2 |
| 72 | 22.2 |
| 100 | 37.8 |
| 150 | 65.6 |
| 212 | 100.0 |
Excel Financial Formulas
Excel has many built-in formulas to do various calculations. We will use only five financial formulas in Excel. To access these formulas, go to the fx or function icon in the standard tool bar. Clicking this icon will open a window containing the formula functions available in Excel. To quickly access the formulas we will use in this course, click Financial under the Function Category, which displays all the Financial Function names. We will only use the following financial formulas for this course:
FV (Future Value): This formula calculates the future value of an investment or any number that grows at a certain interest rate for a certain number of periods.
PMT (Payment): This formula calculates the payment for a certain loan or investment based on a certain interest rate for a certain number of periods.
PV (Present Value): This formula calculates the present value of an investment or loan based on a future amount of the money received or paid given a certain interest rate and a certain period of time.
RATE (Interest Rate): This formula calculates the interest rate per period for a certain loan.
NPER (Number of Periods): This formula calculates the number of periods for a certain investment or loan at a certain interest rate.
TIP: You can also access the most recently used Excel formulas by clicking the down arrow on the formula bar then selecting the formula you want.
You will use some of these formulas in the next chapter.
Lifelong Income Example – Ending Salary
To continue the Lifelong Income calculation to determine your ending salary you should:
- Use the FV or Future Value formula to find out what your annual salary will be when you retire.
- Assume that you will receive an estimated 4% increase in your salary each year and that you will work for fifty years.
- On the “Lifelong Format” in cell E9, enter the FV function by pressing the fx icon and selecting Financial then FV. This will enter the function in the cell and will open a dialogue box where you can enter the data required for the calculation as follows:
- Click OK and the future value of your salary fifty years from now is calculated at $221,728.52. This means that $31,200 will grow to $221,728.52 in 50 years if is grows at 4% interest per year. This growth is the result of compound interest, which will be discussed later in this course.
- Determine the future value of your beginning salary growing at an estimated 4% annual increase for 50 years.
Rate: .04 or 4% (annual increase)
Nper: 50 (number of years you will be employed)
Pmt: 0 (There is no payment because you are calculating the future value of your beginning salary.)
PV: -E7 or -31200 (The present value of your beginning salary)
Type: Omit (The timing of payment is assumed to be at the end of the period in all cases in this course so you do not need to enter anything in Type.)
Note that the PV is entered as a negative. You will generally enter the PV as negative because Excel assumes that money going out is negative and money coming back is positive. If you do not enter the PV as negative, you will get a negative FV.
Lifelong Income Example – Lifelong Salary
To continue the Lifelong Income calculation to determine your lifelong salary you should:
Lifelong Income Calculation – Future Value
Rate: .04 or 4%
Nper: 50
Pmt: -31200
PV: 0
Type: Omit
Lifelong Income: $4,763,213.01
It may be difficult for you to believe that you could be managing almost $5 million of income but that is entirely possible and you want to be able to manage whatever income you earn with skill and insight. That is why what you will learn in this course is essential to your financial success.
Once your calculations are in place, Excel can save you time and effort if changes are required. If you were to change the beginning rate per hour to $10.00 and you have used the cell addresses in each of your formulas, Excel will recalculate all of the numbers and give you the new Lifelong Income or $3,175,475.34 shown below:
Lifelong Income Calculation – Future Value
Rate: .04
Nper: 50
Pmt: -20800
PV: 0
Type: Omit
Lifelong Income: $3,175,475.34
Even at a modest $10.00 per hour beginning salary, you could be managing a lot of money over your lifetime. It is therefore important that you learn to manage it wisely. This course will help you manage your money with tools and sound financial principles. Applying what you learn in this course will make a major difference in your life and your happiness and well being.
Section 2.3 Exercises
Part A
Section 2.3 Exercises Part APart B
Section 2.3 Exercises Part BPart C
Section 2.3 Exercises Part C