Art 230 | Typography
Lesson 10
Project
Project 02 Step 06
Monogram & Stationery: Presentation and Documentation
What are we doing?
For the final step, complete the presentation and documentation for Project 02 | Monogram and Stationery System. Once you have completed the steps for this project see the instructions for making and submitting your process blog post below.
Why are we doing it?
As designers, we need to be able to present solutions in the best or required format. Craftsmanship has traditionally been a hallmark of great designers. Although in the past craftsmanship has been associated with physical production, there are now many forms of presentation at our disposal. You are expected to attain a professional level of craftsmanship both physically and digitally. The only way to develop the necessary skills is by practicing.
How are we going to do it?
Project 02 Final
Create a post on the Behance Network that includes: Monogram and Stationery System. Post a link to your Behance post in WordPress.
AV Presentation Blog Post
Create a short slide presentation (1–2 minutes) to present your final design. Create a voiceover presentation and export. The presentation can be uploaded to a video sharing site like Vimeo or YouTube. Embed the video into a post on the class process blog.
Workbook
The workbook documents the design process that you went through in completing Project 02. You will be creating a PDF file to submit at this point in the semester. Please note that you will need all of the files at the end of the semester to export a complete workbook. You are responsible for keeping these files, and we strongly encourage you to make a backup copy. Missing pages and links will decrease your final workbook grade. To make sure that you have all the workbook pages necessary for Project 02, please check the Workbook section on the Project 02 page.
Export and Submit Final Project
Once the PDF version of your workbook has been exported and reviewed, submit it by clicking Open on the assignment link in I-Learn, attaching the pdf of your workbook, and pasting the URL from your blog post into the comments box.
Process Blog Post
After you have completed all of the steps listed above for this lesson, you are ready to complete your process blog post. Blogposts should be structured like a presentation with a beginning, middle and end. Each step will involve it's own process and its own unique challenges and successes. Introduce the assignment, talk about what worked for you and what didn't, explain which of your solutions are working using design principles to back it up. If you have specific questions about how to move forward, you can ask them in the blogpost.
Please include the following in your blog post:
- Write a 200-word blog post that includes a JPEG image exported from Adobe InDesign.
- Copy the text from the blog post and paste it into Project 04 workbook.
- Include paragraph breaks, subheads or other typographic elements to make the post visually accessible.
- The post should be designed and encourage a reader to engage.
- Include a featured image
You will be graded using the following criteria:
- A link to your images hosted on Behance (50%)
- An AV presentation highlighting your project (15%)
- A 200 word summary in WordPress overviewing your project experience (10%)
- Do not include a compilation of your workbook in your post. Instead, upload it to I-Learn as a pdf (25%)
Title your post "Final Project Submission." To submit your project, open the assignment submission page by clicking Open, attach the pdf of your workbook, and paste the URL from your blog post into the comments box.
After you have submitted your assignment in I-Learn, you will need to provide feedback to your team members in WordPress. Your feedback to team members will be on the following areas:
- Idea: Rate the uniqueness of the overall idea. Is it ordinary and expected or original and unexpected?
- 1–3 pts: unimaginative – confusing
- 4–6 pts: ok – great
- 7–10 pts: great – amazing
- Formal design choices: Rate how well the design principles are used.
- 1–3 pts: unimaginative – confusing
- 4–6 pts: ok – great
- 7–10 pts: great – amazing
- Typography: Rate font choice, size, kerning and spacing, add to the communication of the concept.
- 1–3 pts: not at all
- 4–6 pts: doesn’t help or hurt
- 7–10 pts: significantly adds to the overall communication
- Portfolio: Would you put this in your portfolio? Base this on the quality of the work, not whether it would be appropriate for your personal portfolio.
- 1–3 pts: no
- 4–6 pts: maybe with changes
- 7–10 pts: yes with no changes – absolutely
- Blog Post: Rate the quality of blog post.
- 1–3 pts: messy, unclear, major errors
- 4–6 pts: understandable, organized, rambling, spelling or grammar errors
- 7–10 pts: clear, thoughtful, engaging, free from errors
You should list the item, your rating, and any comments you had to help your team member improve. Your feedback on process blog posts will not be used as part of their grade but will help you to teach one another to improve their work.
Peer Feedback
After you submit the final post for each project, you will be allowed to provide feedback to a member of our class in WordPress. You will complete only one peer review per project in WordPress. For each of your assigned classmates’ final posts, you need to provide feedback using the following rubric:
- Idea: Rate the uniqueness of the overall idea. Is it ordinary and expected or original and unexpected?
- 1–3 pts: unimaginative – confusing
- 4–6 pts: ok – great
- 7–10 pts: great – amazing
- Formal design choices: Rate how well the design principles are used.
- 1–3 pts: unimaginative – confusing
- 4–6 pts: ok – great
- 7–10 pts: great – amazing
- Typography: Rate font choice, size, kerning and spacing, add to the communication of the concept.
- 1–3 pts: not at all
- 4–6 pts: doesn’t help or hurt
- 7–10 pts: significantly adds to the overall communication
- Portfolio: Would you put this in your portfolio? Base this on the quality of the work, not whether it would be appropriate for your personal portfolio.
- 1–3 pts: no
- 4–6 pts: maybe with changes
- 7–10 pts: yes with no changes – absolutely
- Blog Post: Rate the quality of blog post.
- 1–3 pts: messy, unclear, major errors
- 4–6 pts: understandable, organized, rambling, spelling or grammar errors
- 7–10 pts: clear, thoughtful, engaging, free from errors
Think of these peer reviews as opportunities to teach one another by offering suggestions to improve your and others’ work. You should only do peer review once you have submitted your link for the final post of each project. After you have reviewed the assignments, your instructor will also review the work and add comments. Both the instructor and peer comments and ratings will be available for you to see. You can then address this feedback in the next submission.
Exercise
Type Journal | Part 1
What are we doing?
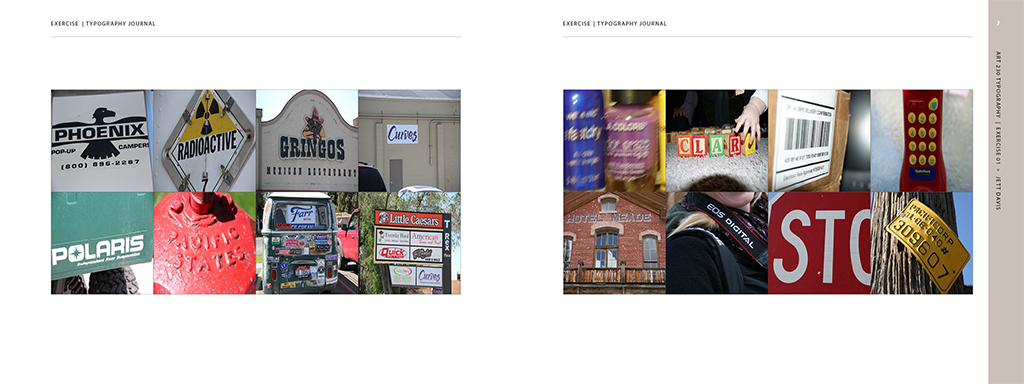
The Type Journal is an opportunity to discover typography in the world that we live in every day. Use a camera to capture examples of typography in your current environment. Complete 8 pages over the next 4 weeks. The image below is an example of 2 pages or about 16 images. Complete 2 pages this week. The complete Type Journal is submitted during Lesson 16.
What we are going to do?
Using a camera, capture examples of typography in the world around you.
Why are we doing it?
Typography is about learning to see. Capturing glimpses of typography provides an opportunity for slowing down and seeing the typographic messages all around us.
How are we going to do it?
Use a camera to capture your typographic imagery. Do not use the Internet. Crop the images to fit into the squares in the Type Journal Exercise workbook. This project needs to be completed with 8 pages and a blog post within the next four weeks.
Once you have completed Part 1 of the Type Journal mark this activity complete in I-Learn by clicking on the "Open" button below and pasting your blog page URL in the space provided. Then, click submit.
Download
Reading
Reading 04
- Text | Thinking with Type by Ellen Lupton (2nd edition)
- Pages | 68–85